CPUトポロジーを見てみた
目的
RHEL公式ドキュメントPerformance Tuning Guideを読んでいたら、CPUのトポロジーを出力するコマンドlstopoが出てきた。実際に使ってみた。
CPUのトポロジーを見る方法
Performance Tuning Guideでは3つ紹介されていた。
- numactl
- lscpu
- lstopo
numactl
NUMA。いわゆるNon-Uniform Memory Access。ヌマ。複数CPUで近いメモリにデータを置きましょう、という考え方のハードウェアアーキテクチャ。numactl自体はNUMAの情報のみ出力してくれる。
事前準備
numactlパッケージが必要。
# yum install numactl
例
$ numactl --hardware
available: 1 nodes (0)
node 0 cpus: 0
node 0 size: 1023 MB
node 0 free: 594 MB
node distances:
node   0
  0:  10
我が家のVMは1CPUなので、何も面白くないですね・・・
lscpu
CPU数、コア数、スレッド数(Hyper-Threading)、キャッシュなどのCPUの基本情報を出力してくれる。
例
$ lscpu
アーキテクチャ: x86_64
CPU op-mode(s):        32-bit, 64-bit
Byte Order:            Little Endian
CPU(s):                1
On-line CPU(s) list:   0
コアあたりのスレッド数:1
ソケットあたりのコア数:1
Socket(s):             1
NUMAノード:         1
ベンダーID:        GenuineIntel
CPUファミリー:    6
モデル:             69
Model name:            Intel(R) Core(TM) i5-4278U CPU @ 2.60GHz
ステッピング:    1
CPU MHz:               2599.998
BogoMIPS:              5199.99
ハイパーバイザーベンダー:KVM
仮想化タイプ:    完全仮想化
L1d キャッシュ:   32K
L1i キャッシュ:   32K
L2 キャッシュ:    256K
L3 キャッシュ:    3072K
NUMAノード 0 CPU:   0
Flags:                 fpu vme de pse tsc msr pae mce cx8 apic sep mtrr pge mca cmov pat pse36 clflush mmx fxsr sse sse2 syscall nx rdtscp lm constant_tsc rep_good nopl xtopology nonstop_tsc pni pclmulqdq monitor ssse3 cx16 sse4_1 sse4_2 x2apic movbe popcnt aes xsave avx rdrand hypervisor lahf_lm abm avx2
あんま打つことなさそう。CPU型番を設計書見ずに知りたいときにいいかな。
lstopo
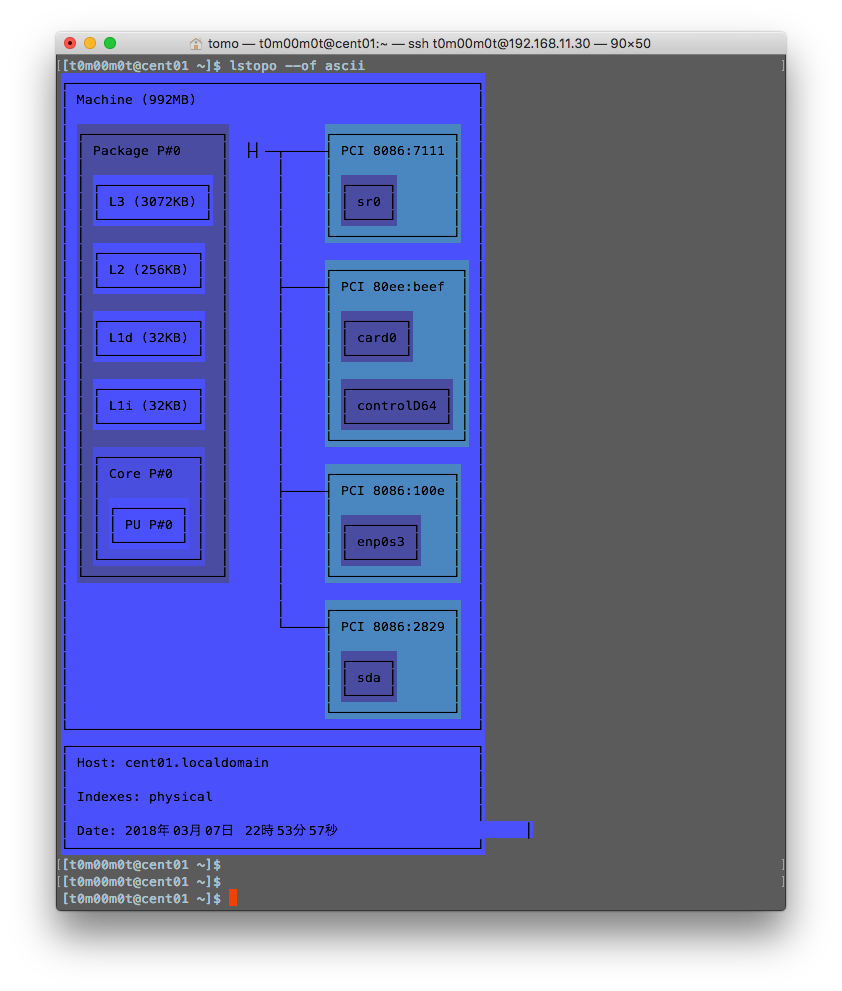
CPUのトポロジーに特化して出力。テキストだけではなく絵で表現することも可能。オプション次第でPDFなどにも出力できる。
前準備
hwlocパッケージとhwloc-guiパッケージが必要。
# yum install hwloc hwloc-gui
例(テキスト)
$ lstopo
Machine (992MB)
  Package L#0 + L3 L#0 (3072KB) + L2 L#0 (256KB) + L1d L#0 (32KB) + L1i L#0 (32KB) + Core L#0 + PU L#0 (P#0)
  HostBridge L#0
    PCI 8086:7111
      Block(Removable Media Device) L#0 "sr0"
    PCI 80ee:beef
      GPU L#1 "card0"
      GPU L#2 "controlD64"
    PCI 8086:100e
      Net L#3 "enp0s3"
    PCI 8086:2829
      Block(Disk) L#4 "sda"
例(絵)
$ lstopo --of ascii

トポロジーをざっと眺めるのにいい。ハードウェアの設計書って「CPUは型番hogehoge / キャッシュxxx /・・・」とか文字で残すだけなので、lstopoを貼っつけた方がまだましだな。
C言語のpid_tを調べる
目的
「Linuxのしくみ」のサンプルコードでpid_tという型がよく現れる。用途はgetpid()の戻り値を代入したり、などなど。このpid_tが何なのか、調べる。
どのライブラリ?
getpid()のオンラインマニュアルを見るとunistd.hで定義しているようだ。
$ man 3 getpid
SYNOPSIS
#include <unistd.h>
pid_t getpid(void);
unistd.hの調査
C言語のincludeのパスは/usr/include。grepかけてみると次のとおり。
$ cat /usr/include/unistd.h | grep -n pid_t
259:# ifndef __pid_t_defined
260:typedef __pid_t pid_t;
261:#  define __pid_t_defined
typedefがわからない・・・
typedefとは
ググってみると次のとおり。
C言語においてtypedefを使用すると既にあるデータ型に新しい名前をつけることができます。
typedef 既存のデータ型 新しい名前;
つまり、pid_tは__pid_tの別名ってことだ。では__pid_tってなに?
__pid_tの調査
__pid_tの文字列を含むファイルを検索したら発見。
$ grep -rnw /usr -e '__pid_t'
(中略)
/usr/include/bits/types.h:142:__STD_TYPE __PID_T_TYPE __pid_t; /* Type of process identifications.  */
次の謎は__STD_TYPEと__PID_T_TYPEだ。
__STD_TYPEの調査
__STD_TYPEの文字列を含むファイルを検索したらあった。
$ grep -rnw /usr -e '__STD_TYPE'
(中略)
/usr/include/bits/types.h:115:# define __STD_TYPE      __extension__ typedef
/usr/include/bits/types.h:126:# define __STD_TYPE      typedef
今度は# defineがわからない・・・
#defineとは
ググってみると次のとおり。
defineはC言語でのプリプロッセッサへの指示のひとつです。プリプロッセッサとは、コンパイルの前に前処理を行うプログラムのことです。下記の構文で記述すると、コンパイル時に前処理として、文字列1を文字列2に変換します。このような変換をマクロ置換と呼びます。
#define 文字列1 文字列2
つまり、__STD_TYPEはtypedefってこと?堂々巡りしている気分。もう一度整理すると、こういうことか。
_STD_TYPE __PID_T_TYPE __pid_t;
は
typedef __PID_T_TYPE __pid_t;
と同じ
__PID_T_TYPEの調査
__PID_T_TYPEの文字列を含むファイルを検索したらあった。
$ grep -rnw /usr -e '__PID_T_TYPE'
(中略)
/usr/include/bits/typesizes.h:53:#define __PID_T_TYPE      __S32_TYPE
お!前進した。要は__S32_TYPEってことだ。
__S32_TYPEの調査
__S32_TYPEの文字列を含むファイルを検索したらあった。
$ grep -rnw /usr -e '__S32_TYPE'
(中略)
/usr/include/bits/types.h:100:#define  __S32_TYPE      int
やった!!!つまりpid_tは単なるintだった。getpid()が返すのは整数なんだ。
参考
CentOSでC関数を調べる
目的
Linuxのしくみを読んでいると、実験用のCサンプルプログラムが多数でてくる。C関数をサクッとLinuxで調べたい。
manコマンドでC関数を調べる
manのセクションの説明は次のとおり。3を指定すれば良い。
1   Executable programs or shell commands
2   System calls (functions provided by the kernel)
3   Library calls (functions within program libraries)
4   Special files (usually found in /dev)
5   File formats and conventions eg /etc/passwd
6   Games
7   Miscellaneous (including macro packages and conventions), e.g. man(7), groff(7)
8   System administration commands (usually only for root)
9   Kernel routines [Non standard]
早速やって見る。
セクション3を指定する場合
C関数のオンラインヘルプが表示される。 読み込むヘッダーも調査可能。
$ man 3 exit

NAME
       exit - cause normal process termination

SYNOPSIS
       #include <stdlib.h>

       void exit(int status);

DESCRIPTION
       The exit() function causes normal process termination and the value of status & 0377 is returned to the parent (see wait(2)).
セクション3を指定しない場合
同名のコマンドのオンラインヘルプが表示されてしまう。
$ man exit

NAME
       bash, :, ., [, alias, bg, bind, break, builtin, caller, cd, command, compgen, complete, compopt, continue, declare, dirs, disown, echo, enable, eval, exec, exit, export, false, fc, fg, getopts, hash, help, history, jobs, kill, let, local, logout, mapfile, popd, printf, pushd, pwd, read, readonly, return, set, shift, shopt, source, suspend, test, times, trap, true, type, typeset, ulimit, umask, unalias, unset, wait -  bash  built-in  commands, see bash(1)
yumでEPELを使う
目的
リソース取得コマンドを調べていてhtopを見つけたが、CentOSではデフォルトでインストールされていない。yum installしたが、どうやらEPELリポジトリからRPMをダウンロードできるよう設定する必要があるらしい。設定メモとして残す。
そもそもEPELとは?
Extra Package for Enterprise Linuxの略。fedora WIKIによると次のとおり。
エンタープライズ Linux 用の拡張パッケージ(EPEL) は、 Red Hat Enterprise Linux (RHEL) 向けの高品質なアドオンパッケージであり、CentOS や Scientific Linux (SL) のような RHEL からスピンオフしたディストリビューションと互換性のある、Fedora プロジェクトで有志によって作成されたパッケージになります。
しかし「エンタープライズ」と言いながら商用サポートなしとFAQにあるので注意。
EPEL は Red Hat が商用サポートしてるの? いいえ、していません。EPEL は Fedora コミュニティからの有志によって作成されたものです。ちょうど Fedora のように、Red Hat はこのプロジェクトのインフラをホスティングしていて、Red Hat のエンジニアはメンテナやリーダーとして関わりますが、EPEL パッケージには Red Hat が提供する SLA(Service Level Agreement) や商用サポートはありません。
EPELレポジトリのインストール
yumで簡単にインストールできる。
# yum install epel-release
読み込んだプラグイン:fastestmirror
base                                                               | 3.6 kB  00:00:00
extras                                                             | 3.4 kB  00:00:00
updates                                                            | 3.4 kB  00:00:00
(1/2): extras/7/x86_64/primary_db                                  | 166 kB  00:00:00
(2/2): updates/7/x86_64/primary_db                                 | 6.0 MB  00:00:01
Determining fastest mirrors
 * base: mirror.fairway.ne.jp
 * extras: ftp.jaist.ac.jp
 * updates: mirror.qoxy.com
依存性の解決をしています
--> トランザクションの確認を実行しています。
---> パッケージ epel-release.noarch 0:7-9 を インストール
--> 依存性解決を終了しました。

依存性を解決しました

==========================================================================================
 Package                   アーキテクチャー    バージョン       リポジトリー         容量
==========================================================================================
インストール中:
 epel-release              noarch              7-9              extras               14 k

トランザクションの要約
==========================================================================================
インストール  1 パッケージ

総ダウンロード容量: 14 k
インストール容量: 24 k
Is this ok [y/d/N]: y
Downloading packages:
epel-release-7-9.noarch.rpm                                        |  14 kB  00:00:00
Running transaction check
Running transaction test
Transaction test succeeded
Running transaction
  インストール中          : epel-release-7-9.noarch                                   1/1
  検証中                  : epel-release-7-9.noarch                                   1/1

インストール:
  epel-release.noarch 0:7-9

完了しました!
yumリポジトリの設定
このままyum installすると、公式パッケージではなく、EPELパッケージでインストールされてしまう。通常はEPELを無効化して、必要な時に使うようにする。
# vi /etc/yum.repos.d/epel.repo
[epel]
enabled=0
インストール直後はenabled=1になってる。
EPELを使う
yumにオプション--enablerepo=epel `を指定する。
# yum --enablerepo=epel search htop
読み込んだプラグイン:fastestmirror
epel/x86_64/metalink                                               | 6.5 kB  00:00:00
epel                                                               | 4.7 kB  00:00:00
(1/3): epel/x86_64/group_gz                                        | 266 kB  00:00:00
(2/3): epel/x86_64/updateinfo                                      | 895 kB  00:00:00
epel/x86_64/primary_db         FAILED
https://repo.fedoralinux.ir/pub/epel/7/x86_64/repodata/b470635ba85e2bed51d930468c38b4a9baede67fc606054ae08987a3c506679d-primary.sqlite.bz2: [Errno 14] HTTPS Error 404 - Not Found
他のミラーを試します。
To address this issue please refer to the below knowledge base article

https://access.redhat.com/articles/1320623

If above article doesn't help to resolve this issue please create a bug on https://bugs.centos.org/

(3/3): epel/x86_64/primary_db                                      | 6.3 MB  00:00:01
Loading mirror speeds from cached hostfile
 * base: mirror.fairway.ne.jp
 * epel: mirrors.nipa.cloud
 * extras: ftp.jaist.ac.jp
 * updates: mirror.qoxy.com
=================================== N/S matched: htop ====================================
htop.x86_64 : Interactive process viewer

  Name and summary matches only, use "search all" for everything.
[root@cent01 yum.repos.d]#
[root@cent01 yum.repos.d]#
[root@cent01 yum.repos.d]# yum --enablerepo=epel install htop
読み込んだプラグイン:fastestmirror
Loading mirror speeds from cached hostfile
 * base: mirror.fairway.ne.jp
 * epel: mirror01.idc.hinet.net
 * extras: ftp.jaist.ac.jp
 * updates: mirror.qoxy.com
依存性の解決をしています
--> トランザクションの確認を実行しています。
---> パッケージ htop.x86_64 0:2.0.2-1.el7 を インストール
--> 依存性解決を終了しました。

依存性を解決しました

==========================================================================================
 Package           アーキテクチャー    バージョン                 リポジトリー       容量
==========================================================================================
インストール中:
 htop              x86_64              2.0.2-1.el7                epel               98 k

トランザクションの要約
==========================================================================================
インストール  1 パッケージ

総ダウンロード容量: 98 k
インストール容量: 207 k
Is this ok [y/d/N]: y
Downloading packages:
警告: /var/cache/yum/x86_64/7/epel/packages/htop-2.0.2-1.el7.x86_64.rpm: ヘッダー V3 RSA/SHA256 Signature、鍵 ID 352c64e5: NOKEY
htop-2.0.2-1.el7.x86_64.rpm の公開鍵がインストールされていません
htop-2.0.2-1.el7.x86_64.rpm                                        |  98 kB  00:00:00
file:///etc/pki/rpm-gpg/RPM-GPG-KEY-EPEL-7 から鍵を取得中です。
Importing GPG key 0x352C64E5:
 Userid     : "Fedora EPEL (7) <epel@fedoraproject.org>"
 Fingerprint: 91e9 7d7c 4a5e 96f1 7f3e 888f 6a2f aea2 352c 64e5
 Package    : epel-release-7-9.noarch (@extras)
 From       : /etc/pki/rpm-gpg/RPM-GPG-KEY-EPEL-7
上記の処理を行います。よろしいでしょうか? [y/N]y
Running transaction check
Running transaction test
Transaction test succeeded
Running transaction
  インストール中          : htop-2.0.2-1.el7.x86_64                                   1/1
  検証中                  : htop-2.0.2-1.el7.x86_64                                   1/1

インストール:
  htop.x86_64 0:2.0.2-1.el7

完了しました!
EPEL以外のリポジトリ
EPEL以外の追加リポジトリを調べたいときは以下サイトを参考にする。
ターミナルを見やすくする
目的
Macのデフォルトのターミナルは白黒で見づらいのでカスタマイズする。

- プロンプトがどこか分かりづらい。色と表示を変えよう。
- ls結果も見づらい。ここも色をつけよう。
設定の流れ
プロンプト
環境変数PS1を使用する。システム全体に適用してもいいけど、今回は特定ユーザのみ。~/.bash_profileで設定する。
ls結果
aliasを使用する。設定箇所は~/.bashrc。
手順
~/.bash_profileと~/.bashrcはデフォルトではMacユーザーで作られていない。
$ ls -al ~ | grep .bash
-rw-------   1 tomo  staff   1922  2 25 10:07 .bash_history
drwx------  59 tomo  staff   2006  2 25 10:13 .bash_sessions/
ログインすると/etc/profile->~/.bash_profile->~/.bashrc->/etc/bashrcの順に読み込んでほしい。まずは~/.bash_profileから設定する。
.bash_profileを作る
PS1でプロンプトを設定して.bashrcを読み込む。
$ vi ~/.bash_profile

# プロンプト設定
export PS1='\e[1;32m\W \t \e[1;31m\u \e[1;32m$ \e[0m'

# .bashrc読み込み
if [ -f ~/.bashrc ]; then
  . ~/.bashrc
fi
PS1の意味
ごちゃごちゃしてるけど、分解するとシンプルに分かりやすくなる。 色なしにするとこんな感じ。色設定がごちゃごちゃの原因。
PS1='\W \t \u $ '
| 設定 | 意味 |
|---|---|
| \W | カレントディレクトリの末端 |
| \t | 時間 |
| \u | ユーザ名 |
色設定は\e[1;32mとか\e[0m。詳細は参考リンクを参照。
.bashrcを作る
エイリアスを設定する。
$ alias ls='ls -FG'
ターミナルの色設定も少しいじる
ターミナルのデフォルトは味気ないので背景色などを変更する。[ターミナル]-[環境設定]-[プロファイル]で設定する。

今回は事前にiTermサイトからプロファイルをダウンロードしてBright Lightsを選んだ。少し透明にしたかったので、[背景]のアイコンをダブルクリックして「透明度」と「ブラー」を調整。
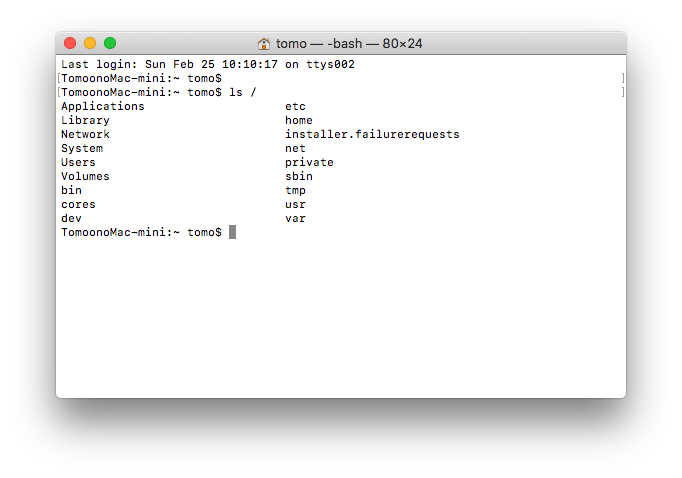
出来上がりはこんな感じ。

参考にしたサイト
Macでhostsを設定する
目的
Macでhostsで名前解決できるようにする。
前提
Macのhostsってどこ?
Linuxだと/etc/hostsだけどMacも同じなのか?ググって見ると2つある。
/etc/hosts
/private/hosts
んん?と思ったが/etcは/private/etcへのシンボリックリンクだった。よって2 つのhostsは同じもの。
$ ls -l /etc
lrwxr-xr-x@ 1 root  wheel  11  1  6 07:16 /etc -> private/etc
$ cat /private/etc/hosts
##
# Host Database
#
# localhost is used to configure the loopback interface
# when the system is booting.  Do not change this entry.
##
127.0.0.1   localhost
255.255.255.255 broadcasthost
::1             localhost
hostsに設定
どっちでもいいわけだけど、大元を編集して終わり。
$ sudo vi /private/etc/hosts
VirtualBoxでLinuxコンソールのウィンドウを大きくする
目的
VirtualBoxのコンソールのウィンドウを大きくする。(そもそもターミナル経由でアクセスするので意味ないのでは?という疑問は置いといて・・・)
手順の流れ
- Guest Additionsのインストール
- GRUB2の解像度設定
Guest Additionsとは?
VirtualBoxには仮想マシンに直接インストールして使い勝手をよくする「Guest Additions」というツールが用意されている。VitualBox公式によるとデバイスドライバとアプリケーションで構成されてる模様。次のような機能あり。
- Mouse pointer integration
- Shared folders
- Better video support
- Seamless windows
- Generic host/guest communication channels
- Time synchronization
- Shared clipboard
- Automated logons (credentials passing)
Better video supportにLinuxのゲストOSのウィンドウサイズを変更できると書いてあった。
In addition, with Windows, Linux and Solaris guests, you can resize the virtual machine's window if the Guest Additions are installed. The video resolution in the guest will be automatically adjusted (as if you had manually entered an arbitrary resolution in the guest's display settings).
Guest Additionsをインストールする
Virtual Boxで仮想マシンを起動する。コンソールのメニューから[Device]-[Insert Guest Additions CD Image…]を選択。ISOイメージがCDドライブにセットされるのでマウント。
[root@cent01 ~]# mkdir /mnt/cdrom
[root@cent01 ~]# mount /dev/cdrom /mnt/cdrom
ISOの中身は次のような感じ。
[root@cent01 ~]# ls -l /mnt/cdrom
合計 52136
dr-xr-xr-x. 2 root root      480 11月 23 01:30 32Bit
dr-xr-xr-x. 2 root root      480 11月 23 01:30 64Bit
-r--r--r--. 1 root root      763 10月 29 00:31 AUTORUN.INF
dr-xr-xr-x. 2 root root     2508 11月 23 01:30 OS2
-r--r--r--. 1 root root      449 11月 23 01:30 TRANS.TBL
-r-xr-xr-x. 1 root root  7771583 11月 23 01:24 VBoxLinuxAdditions.run
-r--r--r--. 1 root root 17794048 11月 23 01:25 VBoxSolarisAdditions.pkg
-r-xr-xr-x. 1 root root 17000072 11月 23 01:29 VBoxWindowsAdditions-amd64.exe
-r-xr-xr-x. 1 root root 10533552 11月 23 01:25 VBoxWindowsAdditions-x86.exe
-r-xr-xr-x. 1 root root   268504 11月 23 01:23 VBoxWindowsAdditions.exe
-r-xr-xr-x. 1 root root     6384 10月 29 00:31 autorun.sh
dr-xr-xr-x. 2 root root      950 11月 23 01:30 cert
-r-xr-xr-x. 1 root root     4821 10月 29 00:31 runasroot.sh
次にVBoxLinuxAdditions.runを実行するが、bzip2、gcc、kernel-devがないと怒られる。
[root@cent01 ~]# sh /mnt/cdrom/VBoxLinuxAdditions.run
Verifying archive integrity... All good.
Uncompressing VirtualBox 5.2.2 Guest Additions for Linux........
VirtualBox Guest Additions installer
Copying additional installer modules ...
./install.sh: 行 371: bzip2: コマンドが見つかりません
tar: これは tar アーカイブではないようです
tar: 前のエラーにより失敗ステータスで終了します
./install.sh: 行 384: bzip2: コマンドが見つかりません
tar: これは tar アーカイブではないようです
tar: 前のエラーにより失敗ステータスで終了します
[root@cent01 ~]# sh /mnt/cdrom/VBoxLinuxAdditions.run
Verifying archive integrity... All good.
Uncompressing VirtualBox 5.2.2 Guest Additions for Linux........
VirtualBox Guest Additions installer
This system appears to have a version of the VirtualBox Guest Additions
already installed.  If it is part of the operating system and kept up-to-date,
there is most likely no need to replace it.  If it is not up-to-date, you
should get a notification when you start the system.  If you wish to replace
it with this version, please do not continue with this installation now, but
instead remove the current version first, following the instructions for the
operating system.

If your system simply has the remains of a version of the Additions you could
not remove you should probably continue now, and these will be removed during
installation.

Do you wish to continue? [yes or no]
yes
Copying additional installer modules ...
Installing additional modules ...
VirtualBox Guest Additions: Building the VirtualBox Guest Additions kernel modules.
This system is currently not set up to build kernel modules.
Please install the gcc make perl packages from your distribution.
Please install the Linux kernel "header" files matching the current kernel
for adding new hardware support to the system.
The distribution packages containing the headers are probably:
    kernel-devel kernel-devel-3.10.0-693.el7.x86_64
VirtualBox Guest Additions: Starting.
VirtualBox Guest Additions: Building the VirtualBox Guest Additions kernel modules.
This system is currently not set up to build kernel modules.
Please install the gcc make perl packages from your distribution.
Please install the Linux kernel "header" files matching the current kernel
for adding new hardware support to the system.
The distribution packages containing the headers are probably:
    kernel-devel kernel-devel-3.10.0-693.el7.x86_64
なので必ずbzip2、gcc、kernel-devをインストールすること。kernel-devはバージョンまで指定しないとだめ。
[root@cent01 ~]# yum install bzip2
[root@cent01 ~]# yum install gcc
[root@cent01 ~]# yum install kernel-devel-3.10.0-693.el7.x86_64
これでやっとGuest Additionsをインストールできる。
[root@cent01 ~]# sh /mnt/cdrom/VBoxLinuxAdditions.run
Verifying archive integrity... All good.
Uncompressing VirtualBox 5.2.2 Guest Additions for Linux........
VirtualBox Guest Additions installer
Removing installed version 5.2.2 of VirtualBox Guest Additions...
Copying additional installer modules ...
Installing additional modules ...
VirtualBox Guest Additions: Building the VirtualBox Guest Additions kernel modules.
VirtualBox Guest Additions: Starting.
GRUB2の解像度を設定する。
GRUB2の設定ファイル/etc/default/grubを修正する。起動時のカーネルオプションに解像度の指定を追加する。カーネルオプションの意味は改めて調べよう。
GRUB_CMDLINE_LINUX="crashkernel=auto rd.lvm.lv=centos/root rd.lvm.lv=centos/swap rhgb quiet"
GRUB_CMDLINE_LINUX="crashkernel=auto rd.lvm.lv=centos/root rd.lvm.lv=centos/swap rhgb quiet vga=771"
vgaのパラメータで「サイズ」「色数」を指定する。参考サイトの英語Wikipediaに説明あり。
手動設定を反映させて、再起動して終わり。
[root@cent01 ~]# grub2-mkconfig -o /boot/grub2/grub.cfg
[root@cent01 ~]# shutdown -r now
参考にしたサイト
VirtualBox 上に構築した CentOS の解像度を変える方法 Guest Additionsのインストール Chapter 4. Guest Additions
